How to replace the DE1 front button
![]()
In this video, we'll show you how to replace the front button of your Decent Espresso machine.
The button needs to be replaced if it's malfunctioning. If such is the case, we provide the nut removal tool along with the button.
This video is part of a series that we produce, helping our users self-repair their Decent Espresso Machine.
Chapters:
1. 00:03 Tools
2. 00:08 Power Disconnection
3. 00:28 Remove External Components
4. 01:10 Remove the machine cover
5. 01:32 Remove the side chassis
6. 02:01 Remove the 2 screws securing the side of the manifold
7. 02:12 Pull out the front button connector
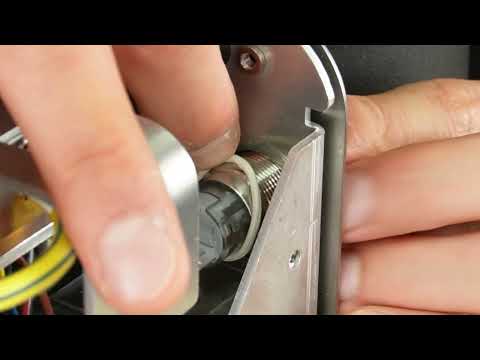
8. 02:24 Remove the nut from the front button with the provided tool
9. 03:05 Remove the o-ring from the front button
10. 03:25 Remove the old front button
11. 03:30 Mount the o-ring on the new front button
12. 03:38 Insert the new front button and adjust the o-ring
13. 04:05 Mount the nut on the front button
14. 04:51 Plug in the front button connector
15. 05:14 Check that the button functions correctly
16. 05:18 Re-install the 2 screws securing the side of the manifold
17. 05:41 Re-install the side chassis
18. 05:57 Contact us with questions
Front button replacement guide
Tools needed
Step 1: Power disconnection
For DE1XL or DE1XXL models:
1. Remove the back panel.
2. Turn off the machine's back switch.
3. Unplug the power cord.
For DE1PRO and DE1PLUS Models:
1. Turn off the machine's back switch.
2. Unplug the power cord.
Step 2: Removal of external components
For v1.43 or higher (slide-in tablet stand):
1. Unplug the USB cable.
2. Gently pull the tablet stand out.
For v1.3 to v1.42 (screwed-in tablet stand):
1. Unscrew the three screws holding the tablet stand.
2. Remove the stand.
Then...
1. Remove the drip tray.
2. Remove the drip tray cover.
3. Lift the lever on the back of the machine.
4. Slide the water tank out and remove it.
5. Remove the portafilter.
6. Remove the group head handle.
Step 3: Remove the main cover
1. Use a T10 screwdriver to remove the 8 screws securing the main cover.
2. Gently stretch the sides of the cover outward.
3. Lift the cover off the machine.
Step 4: Remove the side chassis
1. Identify the screw type for the manifold (T10 Torx or PH2 Phillips).
2. Remove the 6 screws securing the side chassis.
3. Remove the side screw of the boardroom lid (T10 or PH2).
4. Remove the lid.
Step 5: Disassembly
1. Remove the two screws securing the side of the manifold.
2. Press and hold the clip on the front button connector. Gently pull it out with a slight wiggling motion.
3. Insert the nut into the provided tool, making sure it sits firmly in the hex end.
4. Insert a T10 Torx screwdriver through the hole in the tool to use as a lever to loosen the nut
5. Use your index finger to fully unscrew and remove it.
6. Using flat-tip tweezers, remove the o-ring from the bolt.
7. Push the front button assembly from the back and pull it out from the front.
Step 6: Installing the new button
1. Take the new front button and place the o-ring onto the end of the bolt.
2. Insert the front button through its hole from the front side.
3. Roll the o-ring along the bolt until it reaches the inner end.
4. Use the hex tool and screwdriver to fully secure the nut.
5. Plug the connector back in.
6. Adjust the angle of the connector and button assembly until the power icon on the front is perfectly straight.
Step 7: Testing & reassembly
1. Check that the button functions correctly to ensure a successful installation.
2. Secure the manifold using 2 screws on the right side (pump side) of the chassis
3. Install the side chassis.
4. Secure it using all six T10 or PH2 screws.
Step 8: Contact us if you have any questions
Do you have any questions or ran into a problem during the replacement? If so, don't hesitate to reach out to us via our online tech support.
#howto #DIY #repair #documentation
mirjam updated 2026/03/07