How to connect your Plumbing Kit to the machine
The Decent Espresso machine has a built-in 2-liter water tank that you normally have to fill by hand. With our plumbing kit, you can connect your espresso machine to pressurized water, such as you'd get from an RO-system. It is compatible with all the models in the DE1 series (including the DE1PRO, the DE1XL, and the discontinued DE1PLUS) and with Bengle.
What you'll get in the box
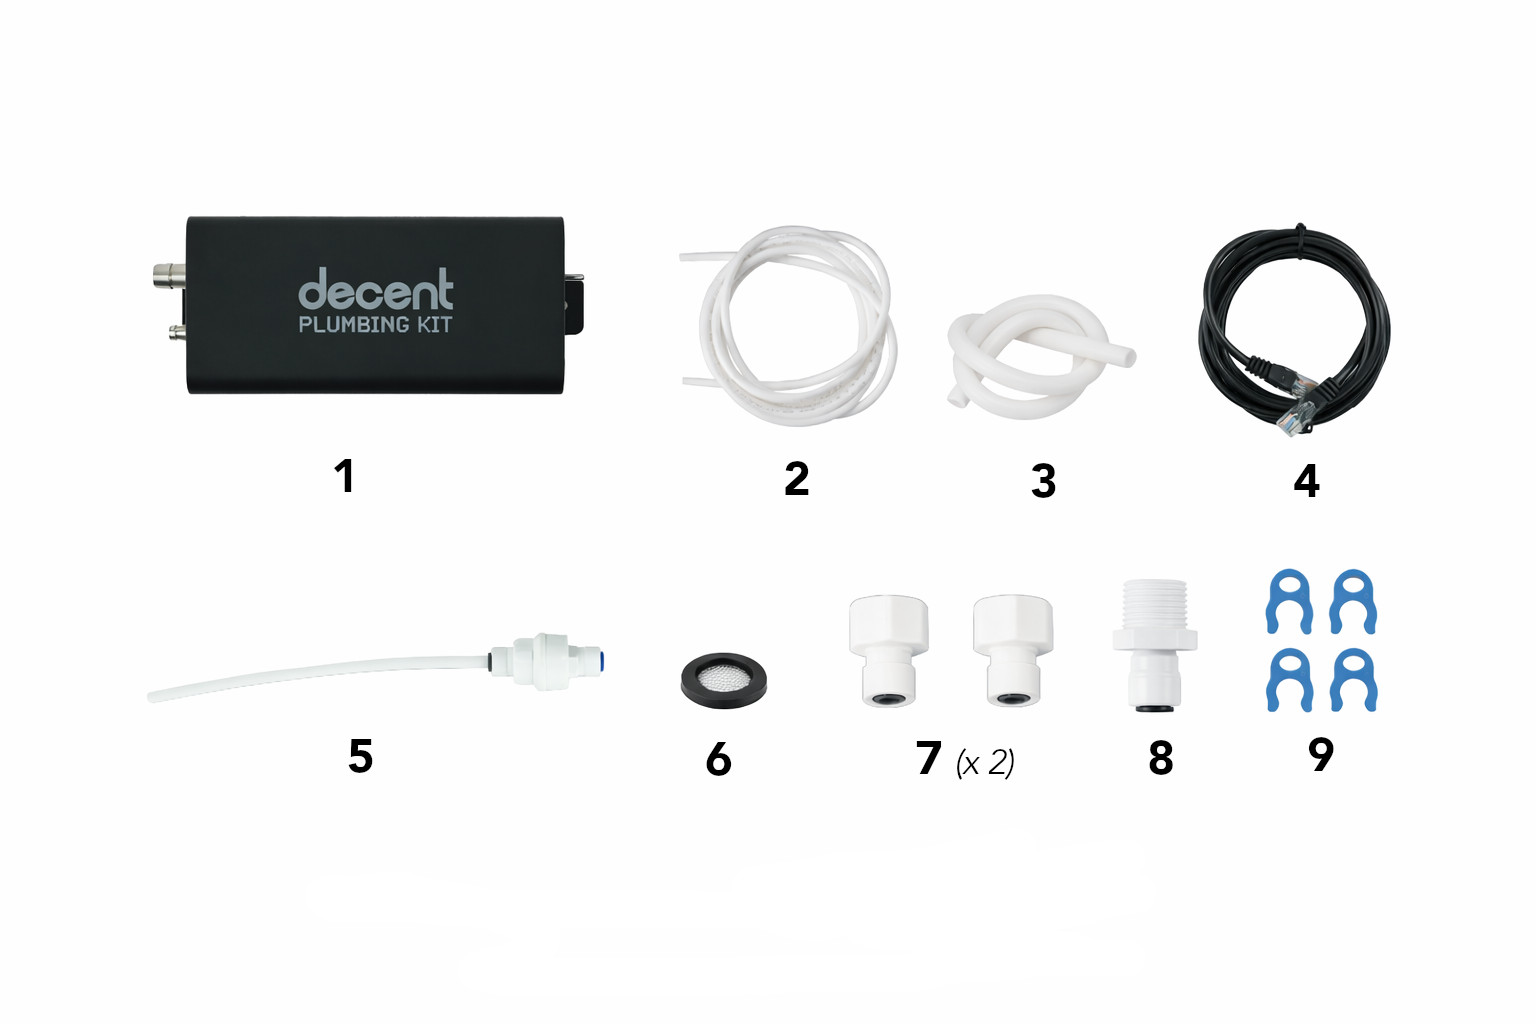
1. The plumbing kit itself;
2. A long, thin white tube;
3. A short, slightly wider white tube;
4. A black network cable;
5. A pressure reducer with a piece of tube mounted to it;
6. Mesh filter gasket;
7. 2 x push-in fitting female NPT 1/2" to tube 1/4" white;
8. 1 x push-in fitting male NPT 1/2" to tube 1/4" white
9. 4 x blue clips;
10. An under-worktop mounting bracket, which already comes mounted to it (you can remove it if you don't need it);
11. A side-mounting bracket, which serves to mount the plumbing kit to the machine or on a wall.
How to mount your plumbing kit
1. Connect your long white tube (2) to the RO water or water filtration system. Pull the tube out slightly, and secure it with a blue clip. We've included an additional female and a male NPT fitting (7, 8) in case your connection is different. If you need a different fitting, please reach out to us.
2. Connect the other end of the long white tube (2) to the pressure reducer (5), namely the side that doesn't have a tube on it. Pull the tube out slightly, and use a blue clip to lock it in place.
3. Next, connect one of the female NPT 1/2 connectors (7) to the end of the tube coming from the pressure reducer (5). Pull the tube out slightly and secure it with a blue clip.
4. Connect the other end of the NPT 1/2 connector (7, which has the tube and the pressure reducer on the other side) to the plumbing kit intake (1) on the left side. Screw it in tightly.
5. Connect the short white tube (3) to the right-side opening on the back of the plumbing kit.
6. Connect the other end of the short white tube (3) to your machine.
7. Connect the black network cable (4) to the square opening on the back of your plumbing kit.
8. Connect the other end of the network cable (4) to the back of your machine.
9. Mount the plumbing kit with one of these options:
Here's what this looks like:


Using the plumbing kit:
1. Turn on the plumbing kit (there's a switch on the back).
2. The plumbing kit activates when the machine detects that it needs more water.
3. The valve opens and water flows from the water source via tubes into the machine's water tray.
4. The machine automatically stops when the water tray is filled to the optimum level.
Do you still have questions?
If so, don't hesitate to contact us via our online tech support.
mirjam updated 2026/03/06