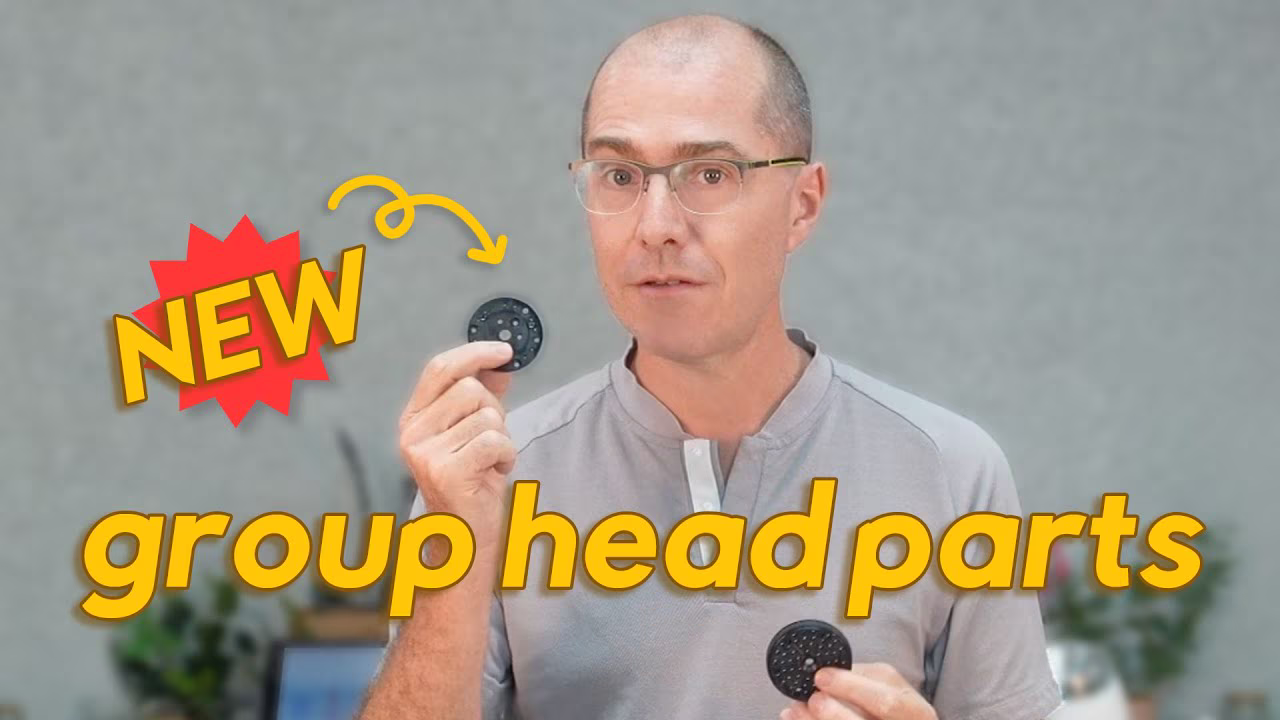
Designing the V2 Grouphead parts
Part 1 - Intro and descriptions.
by Ben Champion, lead product designer at Decent Espresso
In 2017, as part of designing the DE1 espresso machine, we felt a need to revisit how groupheads worked. At that time, the concept of headspace and even water distribution in espresso machine design was largely unexplored.
Many existing machines had simplistic showers with a few holes or a center screw that pushed water outwards, neglecting the importance of even water flow. For example:


To address this issue, my colleague Ray Heasman (the lead inventor on the DE1) and I embarked on a mission to create a design that would ensure a more consistent and even water flow in various use cases.
We used extensive flow simulations to develop a design that promised the desired flow out of each hole.


The initial feedback on these designs was positive, giving us the confidence to proceed with production and shipment.
DEFINITION
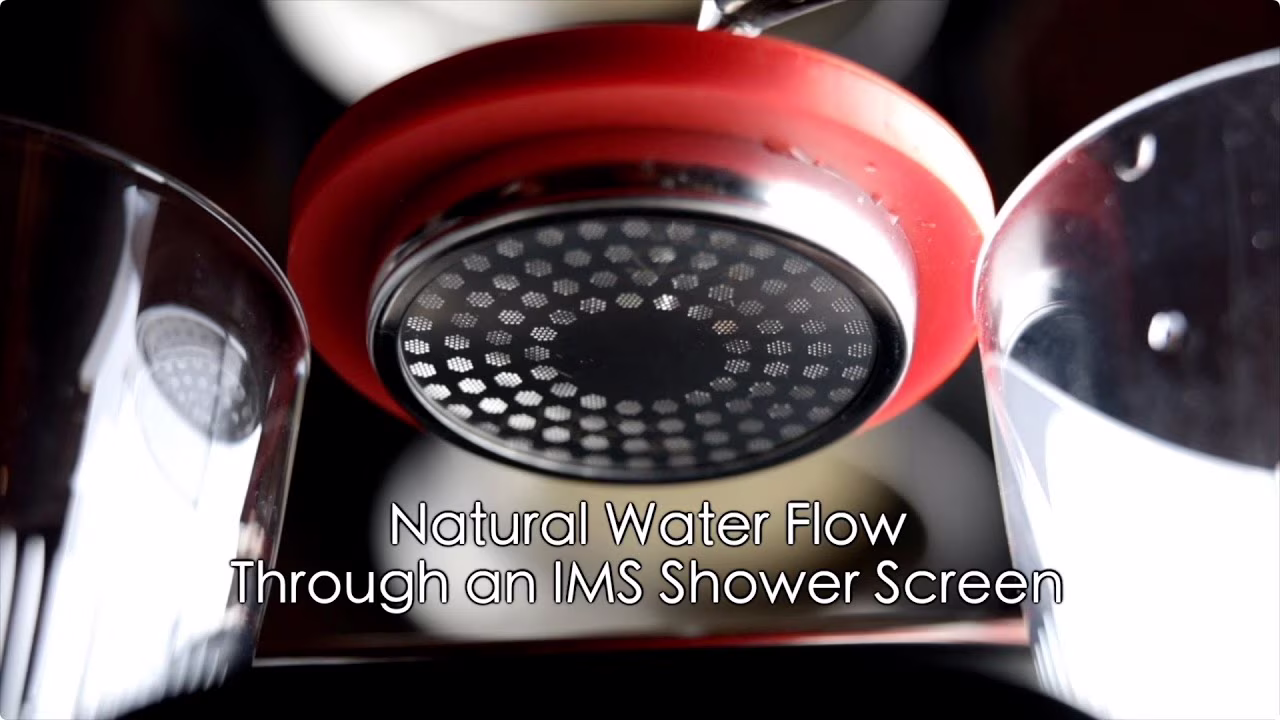
Headspace is the amount of empty space between the top of the coffee puck and the bottom of the shower screen. Headspace is set by distance the grouphead parts protude into the basket.
For the first batch of 300 machines (DE1 v1.0), we misjudged the ideal headspace. We still achieved good extraction, with many people who reviewed the machine talking about how the coffee just tasted better, yielding higher extraction with more flavour clarity. However, we often heard comments saying our machine couldn't achieve thick-bodied espresso when compared to other machines and that our pucks were sloppy and wet.
The community started experimenting by adding spacers between the shower and the screen, decreasing the headspace. Reports from these testers indicated that this made the shots more tick-bodied, with dryer pucks and less channelling. Three companies started selling "shower spacer" kits for our machine to remedy this, and the kits became quite popular with our customers.
Recognizing this issue, we promptly reduced the headspace in the DE1 v1.1 model, ensuring a more reasonable headspace. Since then, we have not changed the grouphead design in production. But for the past four years, we have been looking into understanding and improving these two critical aspects of an espresso machine: water distribution and headspace.
Before diving into the details of our journey, let's establish some essential terms for the key components involved. These are terms that other espresso machine manufacturers use as well.


*
Part 2 - First round of tests.
After the initial release of DE1 v1.0 and from the community's experiments, we realized the significance of getting the headspace right. This new understanding led us to focus on thoroughly investigating these crucial details.
To conduct this study, we enlisted the expertise of two notable figures in the Decent world, Stéphane Ribes and Luca Costanzo. Equipped with a range of new parts, we embarked on extensive testing. The components provided to Stéphane and Luca included two variations of the inner block and a selection of 14 new shower designs of my creation.
 Among the showers, the first nine (S1 to S9) were designed to explore different protrusions and gaps above the screen, with S1 being identical to the brass parts. Two additional showers (S11 and S12) represented typical designs found in other machines, while the remaining three (S10, S13, and S14) served as experimental screens. Stéphane created a comprehensive chart to aid the analysis.
 This collaborative effort set the stage for a detailed examination of the variables we aimed to test: protrusion into the basket and the distance between the shower and the screen. By carefully scrutinizing these factors, we sought to uncover the relationship between headspace, water distribution, and extraction quality.
 You might be wondering why all the parts in the test are transparent yellow.
Because: we switched from using brass to a plastic material called Ultem or PEI.
John explains the rationale behind this decision in great detail in the video linked below. In a nutshell, we aimed for improved temperature accuracy and control during the brewing process.
There was no clear standout winner among the showers, when we only changed the protrusion and headspace (S1 to S9). Testers had diverse preferences, some favouring S1 and others preferring S9—the two extremes.
However, the shower design labelled S10 consistently showed promise throughout the testing phase. While it didn't always outperform other favourites, it consistently received positive feedback from testers. This intriguing result prompted us to prioritize a closer examination of S10's potential and explore ways to refine it further.
Another significant finding was that the typical shower designs commonly found in other espresso machines (S11 and S12) performed much worse than our brass design. This reinforced our confidence that we were on the right track with our approach.
The most remarkable discovery came from comparing the materials. Even with the same distribution and headspace as the brass parts, the Ultem parts provided a noticeably superior taste. Additionally, the group heads remained cleaner over time with the Ultem parts.
 The image provided shows the group head equipped with Ultem parts, which remained remarkably clean even after 100 shots without cleaning. This cleanliness and the improved taste experience solidified our decision to move away from brass. However, we encountered a problem with Ultem parts—they cracked after use.
 In conclusion, the first round of testing revealed that moving away from brass was a significant success. It also highlighted that headspace still requires further investigation. There may not be an optimal headspace for all users. Additionally, the S10 shower design showed promise and deserved further exploration.
Part 3 - Second round of tests.
During this time, Stéphane Ribes conducted radial extraction experiments that revealed significant extraction variations between the coffee puck's centre and edges.
This finding was a pivotal moment in our journey and inspired us to explore new possibilities in shower design to address this challenge.
In this slide, Stéphane shows how extractions vary between 13% to 25% (normal espresso pucks) to between 22% to 25% (puck with filter paper)
 With the aim of achieving more uniform extraction across the entire coffee bed, we embarked on a series of experimental shower designs. Some designs incorporated preferential flow to the outer edges, while others directed the flow towards the centre. Through these experiments, we sought to understand the potential impact of different distribution patterns on the extraction process.
Additionally, an intriguing development arose with the introduction of the Matrix shower screen. This screen was believed to improve water distribution significantly, but it was designed for E61 groupheads, incompatible with our machine. To accommodate this, we designed a new grouphead compatible with the E61 screens for the next round of testing.
 The testing pack sent to the testers included two grouphead designs: one with a centre screw and one for the E61 screens. It included 14 screens, with seven screens per group. For each group, one screen was identical to the brass parts, serving as a control. Three different distribution patterns (center, mid, and outside) were tested, and for each pattern, two headspace designs were made. All these parts were made out of glass-fibre reinforced Ultem, which we hoped would address the cracking issue.
 During testing, we discovered that the traditional E61 shower screens had a design flaw, causing water leakage around the edges. This issue was traced back to a problem in the manufacturing process, specifically two small holes on the edge that caused poor initial wetting.
Here is a video showing the design problem with E61 shower screens:
 This made testing difficult as we couldn't compare the two grouphead designs in an A-to-B comparison using the same screen on both designs. We also found that the Matrix screen did not pair well with the DE1 machine, I suspect you need higher flow rates to really get the most out of this screen.
 We did try other screens, like the IMS DR305 screen, but we didn't see much difference over the centre screw design. For most of the testing, we stuck with the centre screw design as you can change the headspace, while the E61 design has a fixed headspace. We haven't "given up" on an E61 design, but have decided to stick with the center screw design for the foreseeable future.
Among the three distribution designs (centre, mid, and outside preferential flow), it was not surprising that the outside preferential flow design was preferred.
Stéphane's radial extraction experiments showed us that the outside of the puck needed more flow to even out the overall extraction.
More recent testing with new baskets with straight sides and holes extending to the edge shows that the outside preferential flow design is still beneficial.
 Regarding headspace, there was again no clear winner between the two designs.
The decision was made to use a traditional headspace, the same as an E61 screen, which is 1mm more protrusion (1mm less headspace) than our current design. However, to cater to the different preferences, the grouphead was made compatible with two types of screens: the standard IMS CI200 screen and the IMS SI200 screen, which is taller and adds 2.0mm to the protrusion, resulting in 2mm less headspace. This allows users to change the screen and find the best configuration for them for a very low cost and just by changing the screen


On the material front, the reinforced Ultem did not crack. Instead, it warped. Thankfully there are other materials that we can try.


This concluded the testing on different distributions and headspaces.
Although more testing would have been desired, it was a time-consuming process. Testing and comparing espresso shots can be challenging due to slight variations in taste, even when everything is done identically. This variability makes it difficult to determine if small design changes improve the taste since natural shot-to-shot variations can overshadow the effects of individual modifications. Objective metrics like extraction yield (EY) are often relied upon as they provide an easier way to quantify changes. However, the cumulative improvement becomes noticeable by making multiple design changes in the right direction.
After all our testing, we believed we had made several changes in the right direction.
The decision was made to stop testing and to get the improvements we already had found into the hands of our users.
Part 4 - Material Selection.
We now knew the design: next was selecting the right material.
I designed a set of components, including a new inner block and shower compatible with the existing grouphead. I incorporated all the knowledge we had gained, implementing the outside preferential flow and ensuring compatibility with both the CI200 (same headspace as E61) and SI200 (2mm less headspace) screens.
All the materials we tried had suitable specifications sheets, being food safe and able to withstand the operating temperatures easily.
Initially, I chose PEEK as the material as it seemed like the ultimate plastic. It comes with a very high cost but it has remarkable properties.
 However, after only a few shots, the parts made from PEEK ended up in a messy condition, even after rinsing. It was not as clean when compared to Ultem.


Considering an alternative, I turned to PTFE (aka Teflon), a well-known non-stick material capable of handling high temperatures. I assumed it would remain clean, but was concerned about how strong and stiff it would be.
 After several shots, the PTFE parts looked better than PEEK but not as good as Ultem. They were relatively easy to clean but after time seemed to stain.


However, we encountered a major issue with PTFE parts bending.
 Despite this setback, we did send out a number of PTFE parts to testers and received positive feedback, giving us confidence that the upgrade was worthwhile.
Continuing the search for the right material, we then experimented with PPSU, a strong and transparent material commonly used in food-safe products such as baby bottles. Like Ultem, it is Amorphous, so I expected it to remain clean.
 The PPSU parts were very clean, even before rinsing. However, similar to Ultem, it experienced cracking issues.
 Next, we explored PDVF, a material similar to PTFE but with greater stiffness.
 We hoped it would remain as clean as PTFE, and indeed it did. After a quick rinse, the PDVF parts looked beautiful again.


Unfortunately, they were not strong enough and exhibited warping when subjected to a little pressure.
We eventually discovered PPS, a material already utilized in espresso machine valves, albeit often named differently by various companies, like "technopolymer". This renaming had delayed me in discovering it.
 Its properties were intriguing. PPS withstands very high temperatures, with a long-term range above 200°C, way above our normal operating temperature. It has very high dimensional stability, low thermal expansion, and very low Water Absorption. Meaning it won't change in shape/size with use, which is often a problem with plastics. Its Chemical resistance is well known to be outstanding, and it has no known organic solvent under 200°C. It is food safe and is FDA approved. And it is also available in black (cool factor!).
 We had high hopes for PPS, and after using it for some time, it showed no signs of cracking, warping, or bending. PPS parts remained clean, comparable to Ultem. After 100 shots--using the darkest oily beans we could stand--the parts looked like this:
 And a quick rinse bought them back to as good as new condition.
 This was the most promising material we had found and we decided to move onto the next step with it. Stress testing! We have 3 machines in Hong Kong which are constantly going through pressure and temperature cycles:
 These espresso machines perform approximately 7,500 pressure cycles per day (from 0 bar to 13 bar and back) and 750 temperature cycles (from around 40°C to 90°C and back). We do this for all parts in our machine. This rigorous testing assured us of the durability of the parts.
These DE1 internal parts have had 935,000 pressure cycle tests put through them, as of last week.
 Fun Fact: the part that fails the most is the stainless steel no-hole "blind" basket that we install in the grouphead to hold pressure. It normally fails at ~100,000 pressure cycles, at its edge. Here are two baskets that have cracked, even though the DE1 internals show no signs of failing. We have had our test machines do over a million "shots" without failure.


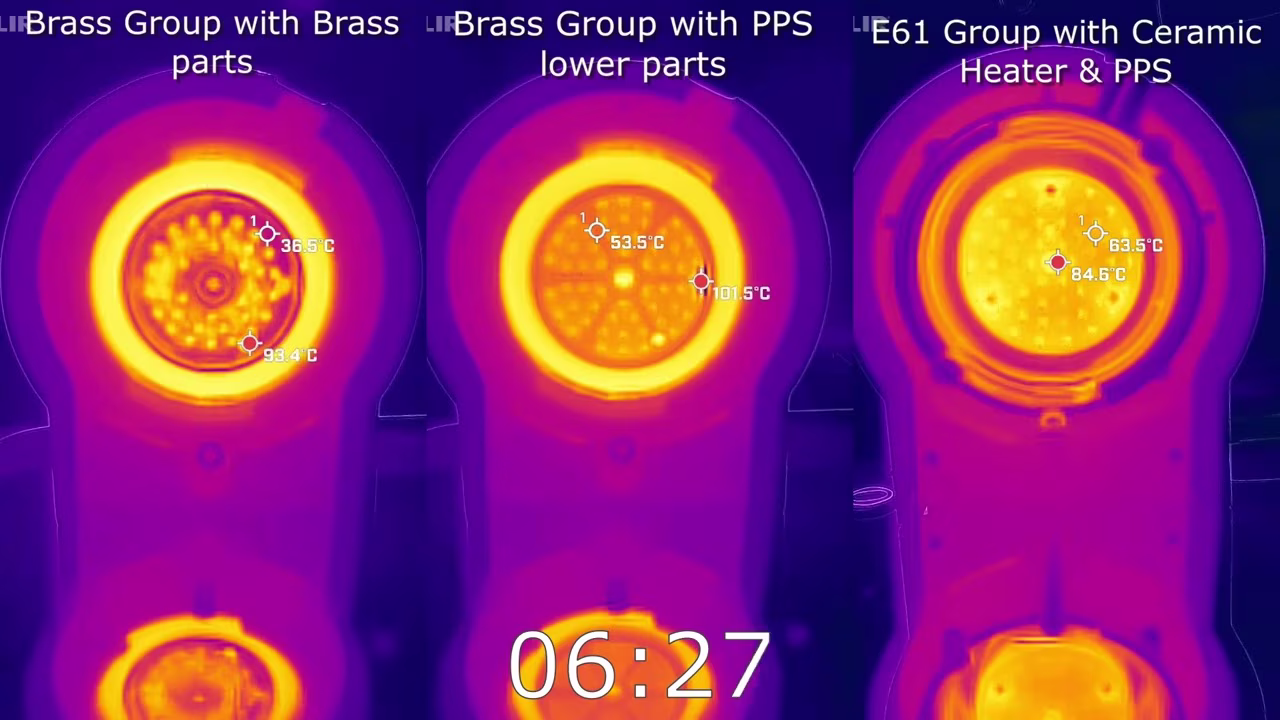
Even Heating Tests
Another test we did was to time how quickly the grouphead heated up. Instead of just timing it, I removed the screen and used a thermal camera to measure the surface temperature of the shower.
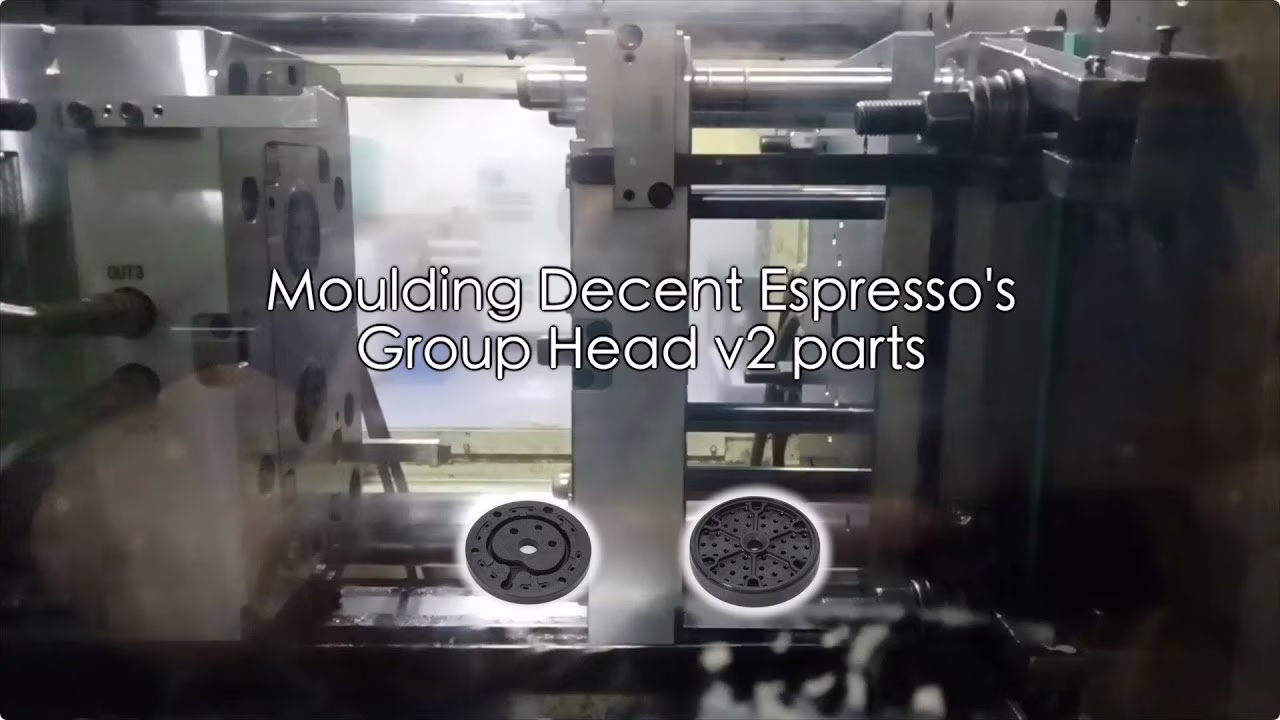
With the design finalized and the material selected, it was time to proceed with manufacturing.
Part 5 - Manufacturing.
Having finalized the design and selected the appropriate material, the next step was manufacturing the parts.
We aimed to produce the parts through injection molding to ensure cost-effectiveness for the upgrade. This posed a challenge, as Decent had no prior experience with injection molding, lacked established suppliers, and had limited expertise in the company.
So how do we pick suppliers?
If tooling fees are low, its possible to order samples from multiple suppliers, and pick one that is most suitable. One that delivers quality products, doesn't have significant delays, communicates well and has a reasonable cost. When tooling is expensive, you must do much more research, talk to many, then pick one and hope they can do what they say.
Before picking the supplier for this part, we engaged in extensive discussions. After a few months, we eventually chose a supplier who proved to be great. They asked us many questions and suggested design changes, showing a deep knowledge of the issues. Other suppliers said "don't worry, it'll be fine" but these people pointed out all the potential trouble spots in our design, allowing us to optimise the parts for manufacturing.
Plastic Injection Moulds are complicated pieces of engineering!
Here are some views of the mold. The dark green parts in the middle are the grouphead parts.


The mold was developed and approved, commencing the waiting period for its manufacturing. Months later, we received a video showcasing the first samples.
Although not perfect, adjustments were made, and after a few minor iterations, we were almost ready for mass production.


There was one final step, we wanted to do our own material tests on the final product. To ensure the material really was food safe. It's fine to trust the material provider's test reports, but it's even better to retest locally on the final item. It passed testing. PDF of passed test lab report.
Everything was a go for launch, so we proceeded to pay for the production run, and not long after, we received the final parts.
It has been a lengthy and challenging process, but well worth the effort. In particular, I enjoyed working with Stéphane and Luca, and I want to thank them for the time they put in and the hard work. Many of the images in this post are from Stéphane, and his reports are beautifully made and very informative.
I hope you're able to enjoy better and more consistent espresso, as a result of four years of work we've put into these parts!
john created 2025/02/27, mirjam updated 2026/02/05