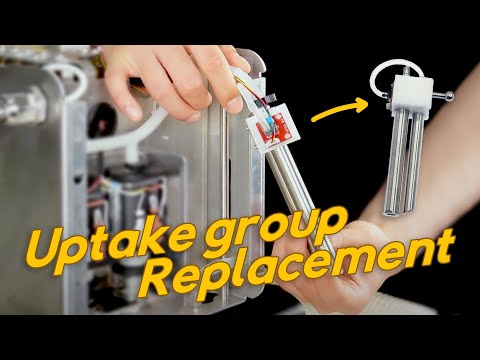
In this video, we'll walk you through how to replace the Uptake group.
The Uptake group includes
Uptake pipe
Water level pipe
Water level sensor
When the metal pipes have scale stuck on them and cause discoloration, you may want to replace the Uptake Group.
Important: Do not open the board room or attempt to access the AC board without our guidance. The AC board carries high voltage.
This video is part of a series that we produce, helping people self-repair their Decent Espresso Machine.
Only do this repair in consultation with Decent tech support
Doing otherwise might break your machine or void your warranty.
Uptake Group Replacement Instructions
Tools Needed
● T10 Torx screwdriver
● PH2 Phillips screwdriver
● T20 Torx Screwdriver
● Angled pointy tweezers
● Pliers
Step 1: Power Disconnection
For XL or XXL Models:
1. Remove the back panel.
2. Turn off the machine's back switch.
3. Unplug the power cord.
For Pro and Plus Models:
1. Turn off the machine's back switch.
2. Unplug the power cord.
For Version 1.43 or Higher (Slide-Type Tablet Stand):
1. Unplug the USB cable.
2. Gently pull the tablet stand out.
For Version 1.3 to 1.42 (Screw-Type Tablet Stand):
1. Unscrew the three screws holding the tablet stand.
2. Remove the stand.
Step 2: Remove External Components
1. Remove the drip tray.
2. Remove the drip tray cover.
3. Lift the lever on the back of the machine.
4. Slide the water tank out and remove it.
5. Remove the portafilter.
6. Remove the group head handle.
Step 3: Remove the Main Cover and Boardroom lid
1. Use a T10 screwdriver to remove the 8 screws securing the main cover.
2. Gently stretch the sides of the cover outward.
3. Lift the cover off the machine.
Step 4: Remove the Chassis
1. Identify the screw type for the manifold (T10 Torx or PH2 Phillips).
2. Remove the 6 screws securing the chassis.
3. Remove the side screw of the boardroom lid (T10 or PH2).
Remove the lid.
Step 5: Remove the Old Uptake Group
1. Use a T20 or PH2 screwdriver to remove the screw on top of the guide rod bracket. (Save the washer)
2. Unscrew the two screws on the back of the machine holding the bracket with a T10 or PH2 screwdriver.
3. Remove the bracket.
4. Lift the uptake group out of the guide rod.
5. Pull out the water level sensor cable from its board.
6. Pull the water level sensor tube from both the plastic and metal barb connectors.
7. Remove the hose clamp.
Hold one ear with pliers
Twist to release it
Stretch to remove it
8. Pull out the F-type tube that connects the intake pipe to the pumps.
Step 6: Install the New Uptake Group
1. Pull the thin tube from the water level sensor.
2. Connect the F-type tube from the pumps to the intake pipe.
3. Reconnect the water level sensor tube to its board.
4. Plug the water level sensor cable into the connector on the board.
5. Hold the tube end with the hose clamp.
● Stretch it open.
● Surround the tube end.
● Rotate it.
● Tighten it with your finger, then pliers
6. Pass the guide rod through the hole in the new uptake group.
7. Install the guide rod bracket.
● Put the center screw back in (Washer between the screw and bracket).
● Install the two screws on the back.
Step 7: Reassemble the Machine
1. Reattach the boardroom lid (1 screw).
2. Reinstall the back panel:
● Insert refill water inlet barb connector.
● Hold panel while tightening the intake lever.
● Pro: Tighten 4 T10 screws.
● XL/XXL: Reinstall 4 standoffs (finger‑tight, then secure).
Reattach the side panel:
● Tighten first 5 screws halfway.
● Then fully tighten all.
#howto #uptake #waterlevel #repair #DIY #documentation